


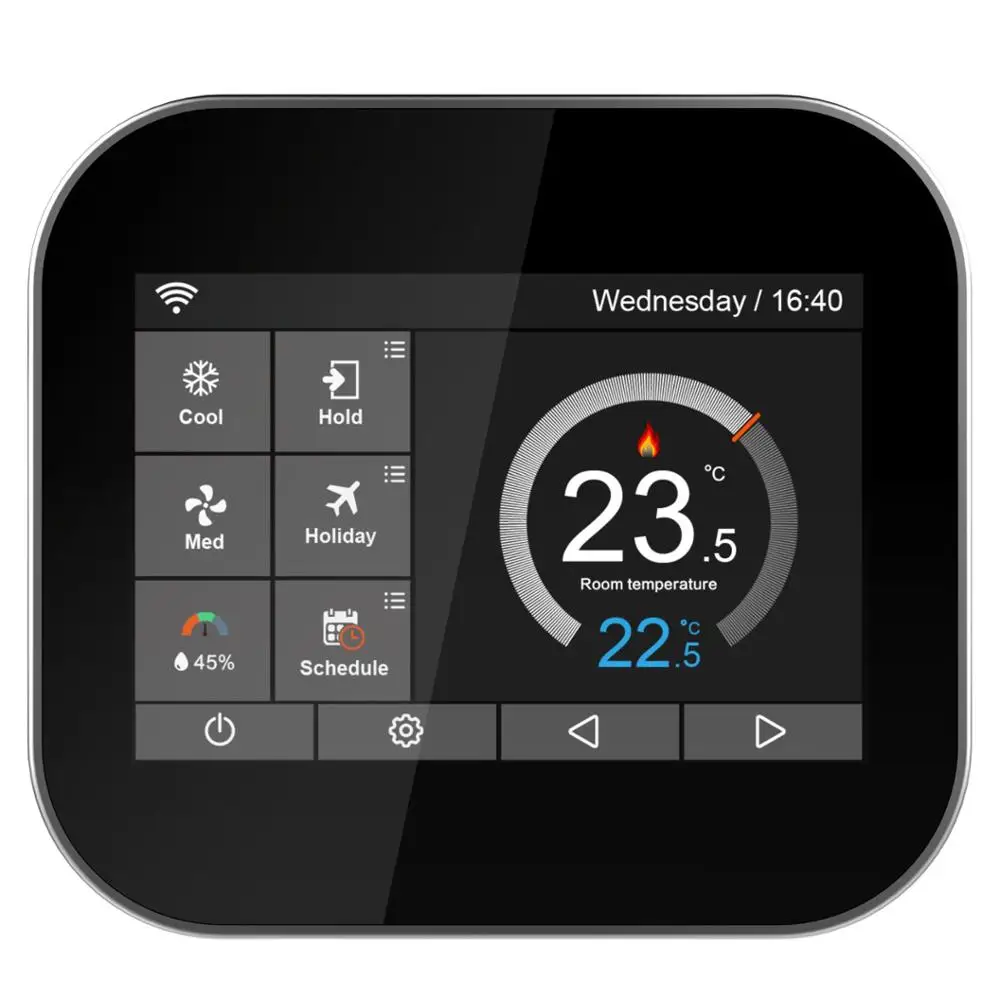
◆Main Display
1,WiFi indicator- Displayed when connected to a WiFi Network
2,Hold:Temperature Hold.
3,Adjusting the optional settings.
4,Day Indicator&Clock
5,Away:Means the MC6-HW is maintaining a lower temperature to give frost protection.
6,OPT(Optimum):Displayyed ON/OFF of the “Optimum Start”
7,Air Humidity:
1)If humidity value less than 30%,the pointer will be in the Red area.
2)If humidity value is between 30% and 60%,the pointer will be in the Green area.
3)If humidity value is more than 60%,the pointer will be in the Gray area.
8,Power ON/OFF
9,Holiday:Displayed when thermostat is in holiday mode.
10,Schedule:Programmable Operation.
11,Setup Button
12,13 Adjusting the Setting Temperature or Turn Page.
14,Setting Temperature display
15,Room Temperature display
16,℃ or ℉ Display
17,Displayed “ Heating” symbol
◆Fearture Settings
Clock Setting
To set the clock,follow these steps.
★Click the icon and enter Feature Settings.
★Click The “Clock Setting”enter Setting Interface
★Click the column of Year/Month/Day,use the icon / to set the Year/Month/Day values.
★Click the column of “Time”,use the icon / to set Hours/ Minute.
★Click the icon to save and return to main display.
Backlight Setting
★Click the icon and enter Feature Settings.
★Click“Backlight”Seclection and enter Backlight Setting.
★Ambient Light Dimming is in Mode:Automatically adjust the backlight brightness.
★Ambient Light Dimming is in Mode:Manually adjust the backlight brightness.
★Use the icon / to adjust to the desired brightness
★Click the icon to save and return to main display.
Standby Screen
★Click the icon and enter Feature Settings.
★Click “Standby Screen”and enter Setting interface.
★There are Four Selection(3Min,10Min,Just Night,Never) to controls the Standby Screen Time.
★For example, setting the standby time is for 10 minutes
Click the icon in the front of “10 Min” and it will turn to .
★Click the icon to save and return to main display.
Screen Lock
★Touch (Click on )the icon and enter Feature Settings.
★Click “Screen Lock”and enter setting interface.
Lock Pin Options
★For example, Setting the Lock Pin is 5209
※Click the First Column ,use the icon / to set to 5
※Click the Second Column , use the icon / to set to 2
※Click the Third Column ,use the icon / to set to 0
※Click the Fouth Column ,use the / to set to 9
★Click the icon to save and return to main display.
Note:To unlock the MC6 press .The display will show and you will need to enter the four digit pin number you set previously.
Temperature Format
★Click the icon and enter Feature Settings.
★Find the “Temp Format” option,click it and enter setting interface.
★There are two Options /
★Click the icon in the front of or ,and it will turn to .
★Click the icon twice to save and return to main display.
Temperature Limit
★Click the icon and enter Feature Settings.
★Find the “Temp Limit ” option,click it and enter setting interface.
★Click the First Column,use the icon / o adjust Minimum Temperature to 5-34℃
★Click the Second Column ,use the icon / to adjust Maximum Temperature to 6-35℃
★Click the icon twice to save and return to main display.
Schedule
★Click the icon and enter Feature Settings.
★Find the”Schedule “option,click it and enter setting interface.
There are four Options:
Weekday/Weekend,7Days,24Hours,None
★For example,Setting the program Mode to 7Days.
※Click the icon in the front of 7 Days,and it will turn to
※Click the icon to save and return to main display.
※Click the “Schedule”on the Main Display,and enter “Edit”interface.
※On the Edit Page,From Monday to Sunday can be selected to edit.
※Click “Monday”and enter Monday’s setting interface.
※There are Four Time Period can be selected:
Morning/Day/Evening/Night
( Each Time Period has Options)
In the program of Monday:
※Morning:
Click the First Column of “Time” ,use the icon / to set desired “Hour”Click the Second Column of “Time” ,use the icon / to set desired Minute.
For Example:The Setting Time is 04 (Hour):00 (Minute)
Click the Third Column of “Temperature”,use the icon / to set desired Temperature.
For Example:The Setting Temperature is 27℃
※Day
The same as Program Morning procedures.
For Example:The Setting Time is 10 (Hour):40 (Minute)
For Example:The Setting Temperature is 24℃
※Evening
The same as Program Morning procedures.
For Example:The Setting Time is 20 (Hour):30 (Minute)
For Example:The Setting Temperature is 26℃
※Night
The same as Program Morning procedures.
For Example:The Setting Time is 24 (Hour):00 (Minute)
For Example:The Setting Temperature is 28℃
Four Time Period:
04:00-10:40: During this time period ,the temperature willremain at 27℃
10:40-20:30:During this time period ,the temperature will remain at 24℃
20:30-24:00:During this time period ,the temperature will remain at 26℃
24:00-04:00:During this time period ,the temperature will remain at 28℃
Switch Diff
★Click the icon and enter Feature Settings.
★Find the “Switch Diff ” option,Click it and entry in setting interface.
★There are four Options:0.5/1/2/3
★Click the icon in the front of “0.5/1/2/3” and it will turn to .
★Click the icon twice to save and return to main display.
Output Delay
★Click the icon and enter Feature Settings.
★Click “Output Delay”and enter setting interface.
★Use the icon / to adjust the Minutes(0-15)
★Click the icon twice to save and return to main display.
Defrost
The thermostat automatically enter the Defrost Mode when the room temperature is drop below the defrost temperature.
★Click the icon and enter Feature Settings.
★Find the“Defrost” option,Click it and enter setting interface.
Temperature Options.
★Use the icon / to adjust the temperature.
★Click the icon twice to save and return to main display.
Sensor Selection
There are five options:
Built in Sensor(Default)
Remote Air Sensor
Floor Sensor Only
Built in &Floor Sensor
Remote Air &Floor Sensor
★Click the icon and enter Feature Settings.
★Find the “Sensor Selection” option,Click it and entry in setting interface.
★Click the icon of which sensor you required.
★Click the icon twice to save and return to main display.
Floor Temperature Limit
★Click the icon and enter Feature Settings.
★Find the “Floor Temp Limit” option,Click it and entry in setting interface.
★Use the icon / keys to set the temperature.
★Click the icon twice to save and return to main display.
★Click the icon and enter Feature Settings.
★Find the “Optimum Start” option,Click it and enter setting
interface.
Options.
★Click the icon twice to return to main display
Daylight Saving Time
★Click the icon and enter Feature Settings.
★Click “DST”and enter setting interface.
Auto DST Options
★There are three options:
European Union/US&Canada/Australia&New Zealand
★Click the icon in the front of “EU/U&C/A&Z” and it will turn to .
★Click the Keys to save and return to main display
System Information
★Click the icon and enter Feature Settings.
★Click “System Information”and enter interface,and it shows
Version Number:2.0
★Click the Keys to Exit
Reset To Factory Settings
★Click the icon and enter Feature Settings.
★Click “ ”and enter setting interface.
★Click “Reset” to factory settings
★Click the Keys to Exit.
Warning:Reset will make you lost the current Settings and return to the factory Settings.
Installation
Install the thermostat at the visual level.
Please read the instructions in order to better understand our products.
Do not install in areas close to the heat source, which will affect its function.
This MC6 thermostat is designed to be flush mounted and requires a 35mm power box in the wall.
Step 1
Using a flat-blade screwdriver, loosen the screws from the bottom face of the front of the thermostat, and then separate the front half from the backplate.
Step 2
First place the front panel of the thermostat in a safe place.
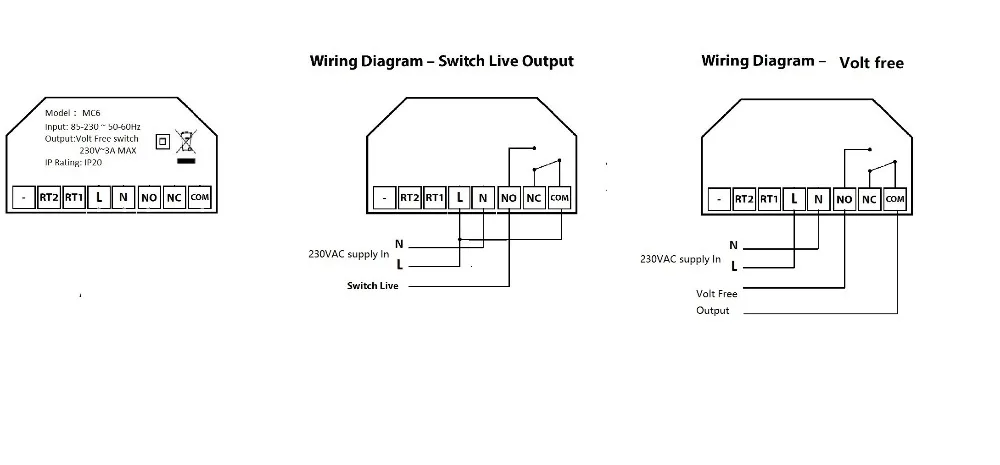
And then follow the wiring diagram on page *** of manual for connecting terminals.
Step 3
Screw the thermostat backplate into the mounting box in the wall.
Step 4
The thermostat front panel in the thermostat backplane fastening, and then lock the screws.
Fasten the front of the thermostat onto the backplate,securing it in place with the retaining screw.
◆Technical Specification
Power supply :110-230VAC,50/60 Hz
Setting temp range:5-35℃
Working temp range: -10-45℃
Temp accuracy:±1℃
Power consumption:1W
Floor Temperature Limit:20-45℃
Max Switch Current:3A/5A(Optional)
LCD screen size:3.5 Inch
Touch:Capacitive touch
Dimention: 96 * 86 * 42.5 (W*H*D) mm
Wifi:802.11 b/g/n (2.4G)
◆Wiring Diagram


Comments
Post a Comment